
Ballasted vs. Mechanically Attached Solar Mounting for Flat Roofs
Choosing the right hardware for a commercial flat roof solar project can feel overwhelming. You're facing a significant investment, and the debate over ballasted vs. mechanically attached solar mounting is full of strong opinions that can leave you stuck. Making the wrong choice could lead to costly roof leaks or, even worse, structural damage. The solution starts with shifting your focus from the mounting system itself to the single most important factor: your roof.
The core difference between ballasted and mechanically attached solar mounting comes down to a trade-off: ballasted systems use weight to hold the array in place, avoiding roof penetrations but requiring the roof to have significant spare structural load capacity. Mechanically attached systems anchor directly to the building's structure, minimizing weight but creating penetrations that must be expertly waterproofed.
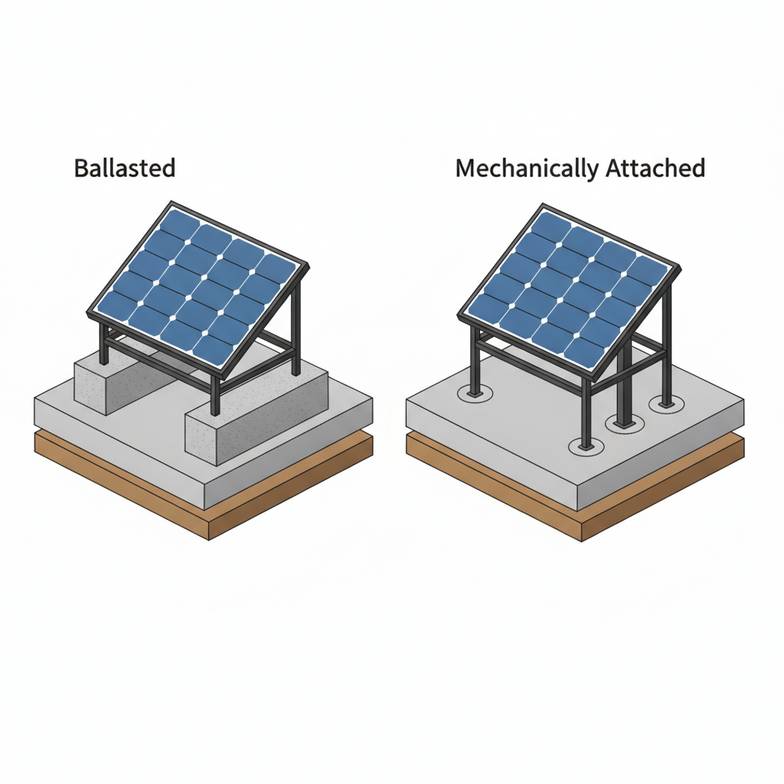
This fundamental trade-off is the key to your decision. It isn't about which system is "better" in a vacuum, but about which system's risk profile and installation requirements best align with your specific building, budget, and local environment. Let's dive into the details you'll need to make an informed choice.
When Does a Ballasted Solar Mounting System Make Sense?
Are you managing a project with a brand-new roof membrane, and the building owner is adamant about not drilling any holes? A ballasted system seems like the perfect, non-invasive solution. But this "non-penetrating" approach introduces a different kind of risk: the immense weight of the ballast blocks, which must be carefully calculated and placed to avoid overloading the roof structure.
A ballasted solar mounting system makes sense primarily on newer buildings with a high, verified structural load capacity. It is the preferred choice when preserving the roof membrane's integrity is the absolute top priority and the structure can safely handle the additional dead load of concrete blocks holding the array down.
Dive Deeper: The Nuances of a "Weight-Based" Solution
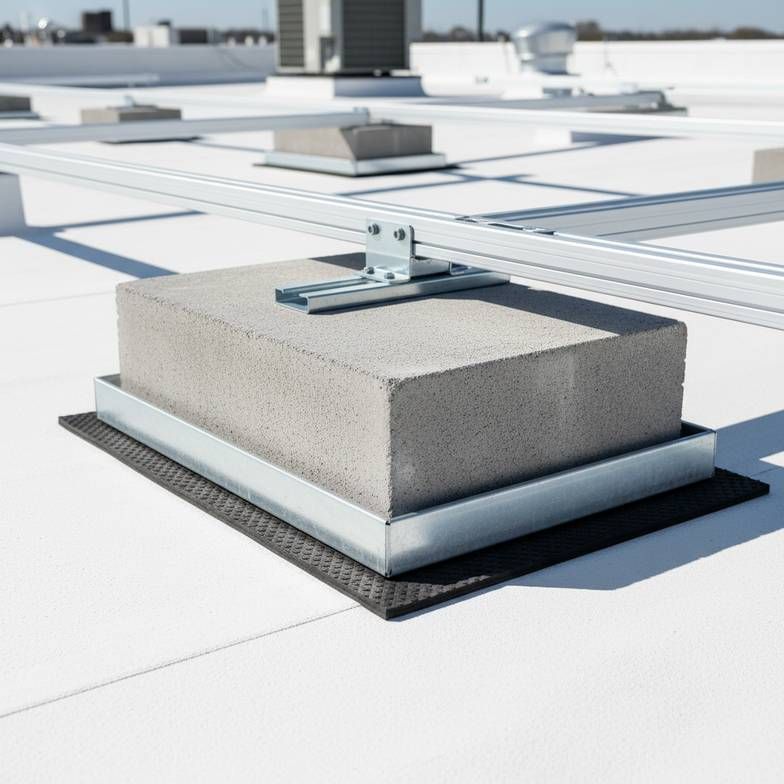
A ballasted system is an elegant piece of engineering. Instead of bolts, it relies on simple physics: gravity. Concrete pavers or blocks are placed in engineered trays or on the mounting hardware itself, creating enough weight to resist wind uplift and keep the solar array secure for decades. In my experience handling customer inquiries, the term "non-penetrating" is what gets everyone's attention. It sounds simple and safe.
However, the reality is a bit more complex. The weight isn't spread out perfectly evenly. You have concentrated loads at the points where the ballast blocks sit and distributed loads across the entire array. This is where things get serious.
The Critical Factor: Structural Load Capacity
Before you even request a quote for a ballasted system, you need one thing: a structural analysis of the building conducted by a licensed professional engineer. This is non-negotiable.
A frequent question we receive from project buyers is, "How much weight does it add?" There's no single answer. The required ballast load depends on:
Local Wind Loads: A project in a high-wind zone like Florida will require significantly more weight than one in a calmer region.
Building Height: Taller buildings experience higher wind speeds.
Array Tilt Angle: A steeper tilt (e.g., 10-15 degrees) catches more wind and requires more ballast than a lower-tilt (5 degrees) design.
Position on the Roof: The corners and edges of a roof experience much higher wind uplift forces than the center. This often means more ballast is concentrated in these perimeter zones.
A supplier like us uses this engineering data to create a ballast map, showing exactly how many blocks are needed and where. Without that initial structural report confirming the roof can handle the load (typically between 5-15 lbs/sq ft, but sometimes more), a ballasted system is simply not a viable option.
Ideal Roof Conditions for Ballasted Systems
Beyond load capacity, a few other conditions make a roof a good candidate for ballasted mounting:
| Factor | Ideal Condition | Why It Matters |
|---|---|---|
| Roof Slope | Less than 5 degrees | On steeper slopes, ballast blocks can shift or slide over time due to gravity and thermal expansion/contraction. Most ballasted systems are not designed for slopes greater than 5-7 degrees. |
| Roof Membrane | EPDM, TPO, PVC | These modern, single-ply membranes are durable. A slip sheet or separator pad is always placed between the mounting hardware and the membrane to prevent abrasion. |
| Roof Age | Newer (under 10 years) | An older roof may have a degraded membrane or a structure that has settled over time. Placing a 25-year solar asset on a 15-year-old roof that will need replacing in 5 years is a logistical and financial headache. |
| Warranty | Clear terms | You must check the roof warranty. Some manufacturers have specific requirements or approved methods for installing solar to keep the warranty intact. |
Why Choose Mechanically Attached Solar Mounting Instead?
So, what if your structural report comes back and the roof just can't handle the extra weight? Or maybe your project is in a high-snow region where the combined weight of snow and ballast would be far too much. This is where you'll want to consider the alternative. But the idea of drilling hundreds of holes in a perfectly good roof can be unnerving. The key to success isn't avoiding penetrations, but ensuring every single one is done right.
A mechanically attached solar mounting system is the solution for roofs with limited load-bearing capacity or for projects in areas with very high wind or snow loads. By anchoring directly to the building's structural joists or deck, it transfers wind uplift forces to the structure, not the roof membrane, providing a secure connection with minimal added weight.
Dive Deeper: Security Through Structural Connection
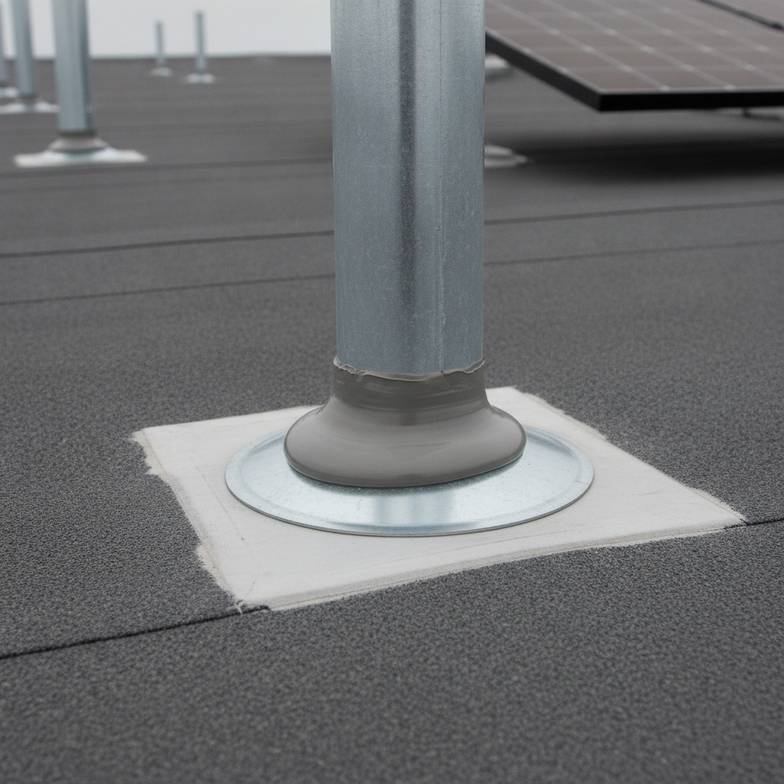
Mechanically attached systems, also known as fixed or penetrated systems, use specialized roof attachments that are bolted directly into the building's structure. These attachments are designed with integrated flashing and seals to create a permanent, watertight connection point.
Customers often focus on the number of penetrations, but the more critical variable to verify is the quality of the attachment hardware and the skill of the installation crew. I've seen projects where installers used high-quality mounts with multi-layer sealing, and those roofs have been leak-free for over a decade. I've also heard of projects where cutting corners on sealant or improper installation led to major issues.
The Critical Factor: Waterproofing and Installation Quality
A successful mechanically attached installation hinges on two things: the hardware and the hands that install it.
The Hardware: Modern roof attachments are not just simple L-feet. A quality attachment for a commercial flat roof includes several components designed to work together:
Base Plate: Spreads the load and provides a surface for the sealant.
Structural Screws: These fasteners are designed to anchor into steel purlins, wood joists, or a concrete deck.
EPDM Rubber Gasket/Washer: This is the first layer of defense, creating a compressed seal around the fastener.
Flashing or Sealant Well: A raised metal "cup" or flashing that integrates with the roof membrane. The final weather sealant is applied around the post inside this well, keeping it protected from direct UV exposure and water pooling.
The Installation: A qualified solar installer will follow a precise process for every single penetration. This includes cleaning the membrane, applying the correct type and amount of compatible sealant, and properly torqueing the fasteners. This is not the place to rush.
When Attached Systems are the Only Choice
While a ballasted system might seem preferable, there are several scenarios where mechanically attached solar mounting is the only safe and code-compliant option:
Low Load Capacity: For older buildings or lightweight structures where the structural engineer has ruled out any significant added dead load.
High Wind/Seismic Zones: In hurricane-prone regions or areas with high seismic activity, building codes often mandate a direct structural connection. The robust anchoring of an attached system is simply more reliable under extreme forces.
High Snow Load Areas: In places that get heavy snowfall, the roof is already designed for a massive temporary load. Adding the permanent weight of ballast on top of that is often impossible. An attached system adds negligible weight.
"Steeper" Flat Roofs: For roofs with a slope greater than 5-7 degrees, the risk of ballast shifting is too high. Mechanical attachments are required to hold the array securely in place.
How Do You Decide Between Ballasted vs. Mechanically Attached Solar Mounting?
You've seen the trade-offs: weight vs. penetrations, structural risk vs. waterproofing risk. But how do you apply this to your actual project and make a final call? The process can feel like a high-stakes decision with incomplete information. The solution is to remove the guesswork and follow a data-driven evaluation process, answering key questions one by one.
The right decision between ballasted vs. mechanically attached solar mounting isn't a matter of opinion; it's the result of a systematic checklist. You need to gather specific data about your building's structure, roof condition, local codes, and project logistics to determine which system's risk profile you are better equipped to manage.

Dive Deeper: Your Step-by-Step Evaluation Checklist
As a supplier, our goal is to provide a system that is safe, effective, and compliant. To do that, we need our customers to do their homework. Here is the exact process I walk buyers through every day.
1. Get a Professional Structural Analysis
This is step one, always. A licensed structural engineer must assess the building and provide a report that clearly states the roof's available spare load capacity for both dead loads (permanent weight) and live loads (like snow). This report is the single most important document in the entire decision-making process.
2. Review the Roof Warranty
Get a copy of the building's roof warranty. Read it carefully. Does it mention solar? Many major roofing manufacturers (like Carlisle, Firestone, GAF) have specific guidelines and approved attachment methods. Following their process is crucial to keeping the warranty intact. Sometimes, they may require a specific installer or an inspection after the job is complete.
3. Check Local Building Codes
Your local Authority Having Jurisdiction (AHJ) sets the rules. You need to know the specific wind speed, snow load, and seismic design requirements for your project's exact location. This data, which is usually included in the structural analysis, will directly influence the design of either a ballasted or attached system.
4. Assess Installation Logistics and Labor
Consider the practical realities of the installation:
Labor Skill: Does your installation team have extensive, documented experience with waterproofing commercial roof penetrations? If not, a ballasted system might reduce your installation risk.
Site Access: How will you get hundreds of heavy ballast blocks to the roof? It often requires a crane, which adds cost and complexity. An attached system involves carrying up lighter-weight rails and components.
5. Consider a Hybrid Approach
Sometimes, it's not an either/or choice. On large, complex roofs, we sometimes design hybrid systems. A ballasted system might be used on the main field of the roof where the structure is strongest, while a mechanically attached system is used around the perimeter and corners where wind uplift forces are highest.
To determine the right system for your project, a supplier will need this information:
The full structural engineering report.
The building's full address (to verify wind/snow/seismic codes).
Roof construction details (e.g., steel deck with TPO membrane, concrete deck, etc.).
A roof layout drawing showing dimensions, obstacles, and the desired location of the array.
The datasheet for the solar module you plan to use.
With this data, we can engineer a solution that is safe, code-compliant, and tailored to your specific building.
Frequently Asked Questions
Can you use a ballasted system on a sloped roof?
Generally, no. Ballasted systems are designed for flat or very low-slope roofs, typically under 5 degrees. On steeper slopes, the forces of gravity combined with thermal expansion and contraction can cause the ballast blocks and the entire array to slowly creep downwards over time, posing a significant safety risk.
How much weight does a ballasted solar mounting system add?
This varies widely based on project-specific factors like local wind codes, building height, and array tilt. It can range from as low as 5 lbs per square foot to over 15 lbs per square foot. A definitive weight can only be determined after a structural engineer performs wind load calculations for your specific project.
Does a mechanically attached system void my roof warranty?
Not necessarily, but it requires careful coordination. Most major roofing manufacturers have programs and specifications for solar installations. To maintain the warranty, you typically must use their approved attachment products and installation methods, and sometimes have the work performed by a certified installer. Always consult the warranty provider before starting work.
Which system is cheaper, ballasted or mechanically attached?
It depends on how you define "cost." Ballasted hardware can sometimes be less expensive per watt, but it may require a crane for installation, adding significant cost. Mechanically attached systems might have higher material and skilled labor costs but avoid the need for a crane. You should always compare the total installed cost for both options.
Conclusion
The debate over ballasted vs. mechanically attached solar mounting is often framed as a simple preference, but it’s a critical engineering decision. The right choice doesn't come from a sales pitch; it comes from data. The process begins with a professional structural analysis to understand your roof's capacity and ends with a system design that respects those limits. A ballasted system trades penetrations for weight, while an attached system trades weight for penetrations. Your job is to determine which trade-off presents a more manageable risk for your specific building, budget, and local climate.
If you have your project details ready, including a structural report, roof drawings, and module specifications, we can help you take the next step. Submit your project information to our team, and we can prepare a suitable solar mounting proposal and quotation to ensure your project is built on a solid, secure, and reliable foundation.
Written by
XINVOK Technical Team
Practical solar mounting knowledge for EPC teams, distributors and project buyers.
Project inquiry
Talk to Our Team
Share your project location, module size, mounting type, quantity and customization requirements.